![]()
How to publish/deploy Django website in Cpanel

As a web developer, I have always done every project using Django because it provides rich features that ensure your web application is flexible, customizable, and performs well in a production environment.
Hosting your Django application on a VPS such as on Digital Ocean works great for a web application that handles huge traffic.
But, if you want to deploy a website that handles relatively medium traffic, shared hosting is a great choice:
- It is economical
- You can host an unlimited amount of websites depending on the hosting provider.
- It is easier to set up.
To host a Django project on a shared hosting account, you must log in to your cPanel and have your Terminal access.
If you cannot locate the Terminal app on your Dashboard, you can contact your web hosting company to activate it for you.
However, you should be cautious when using the Terminal.
You can quickly delete files that are essential for your server to run.
You can find a detailed introduction to the basic bash commands here.
Let’s get started.
Setup a working Django project
To get started, let’s set up a simple Django project that we can use for hosting. You are free to use your own Django project that you may have created before.
Skip to this step if you already have a project.
A simple Django project that displays colorful text on a webpage should get us started.
However, you can always check this article that shows you a detailed guide to setting up a portfolio website using Django.
Follow these steps:
Step #1: Create and activate an environment
Open the Terminal and create a new folder that you will use for your Django project.
Create a new environment in your preferred location. I prefer to keep all the environments in one location.
To do that, copy and paste the following command on your Terminal.
python3 -m venv ~/.virtualenvs/my-django-project-envReplace .virtualenvs/my-django-project-env with your preferred project name and location.
After creating the environment, activate it by typing the command below in your Terminal.
└─$ source ~/.virtualenvs/my-django-project-env/bin/activateRemember to replace the Django location that you had specified earlier.
Step #2: Install Django in your environment
You are now ready to install Django on your activated environment.
Type the following command to install the latest Django in your environment.
└─$ pip3 install djangoAfter you have successfully installed Django, go ahead and create a new Django project.
Type the following command to set up a new Django project.
django-admin startproject simple_django_project .To open your new Django web app in your web browser, type:
python manage.py runserverOpen your browser and type 127.0.0.1:8000 in your web browser’s address bar.
Your new project is ready to be customized to suit your design, functionality, and performance needs.
But, we can do a couple of things like displaying a custom message on the home page of our website.
To do that, you create a new application and register it in the main app settings.py file.
As per your new app, create a new urls.py file and register it to the main project urls.py. Follow these steps to complete the tasks above.
Task #1: Create a new app by typing:
python manage.py startapp homeTask #2: Register your app
Open the project folder with your preferred editor, such as Visual Studio Code.
If you have VS code, type the following command in your terminal in the directory where you have your Django project.
code . Navigate into the project’s main folder.
Within the folder, locate the settings.py file and open it.
Locate the line starting with “INSTALLED APPS” and insert the following line at the end of the list to register your app.
'home.apps.HomeConfig',Replace the name “home” with the name you specified for your new app.
Task #3: Create a new urls.py file for your app and register it in the main project urls.py file
Create a new file named urls.py in the app directory. In this case, the home directory.
Add the following code to your new file.
from django.urls import path

urlpatterns = []
Open your main project urls.py and add the following line inside the list with the variable name, urlpatterns.
Also, import include from django.urls
path(' ', include('home.urls')),Your final file should look like this:
from django.contrib import admin
from django.urls import path, include

urlpatterns = [
    path('admin/', admin.site.urls),
    path('', include('home.urls')),
]
Task #4: Display the current time on your home page
Open views.py of your home app, delete everything, and type the following:
from django.shortcuts import render
from django.http import HttpResponse
import datetime


def homepage(request):
    time_now = datetime.datetime.now()
    html_to_display = f"""
        <html>
            <body>
                <h2>It is now {time_now}</h2>
            </body>
        </html>
    """
    return HttpResponse(html_to_display)
The code above displays the current time upon opening the home page of our Django website.
Add the following line to your app urls.py file.
from .views import homepageThen add this line in the urlpatterns list:
path("", homepage, name="home"),Open your browser. You should see the current date and time.
Let’s set up our new application and host it on cPanel.
How to host Django project on cPanel
Login to your cPanel account.
Make sure your hosting provider support hosting of Python apps.
If you do not have one, consider getting a Shared Hosting plan on Namecheap. They are very affordable, support Django apps and their service is perfect.
You can use this link to sign up with them and you will get a discounted price while you check out.
Step 1: Set up a domain name for your Django application
Once you have logged in, locate the Domain tool on the home page of your cPanel account

Go ahead, locate the Domains link, and click on it. Probably, they will be under the Domains tab.

Create a new domain name that you will use for your Django project.
However, you will need to purchase a new domain name from your hosting company.
After buying the domain name, create a new domain using the same name.
If you purchased a domain name called mysite.com as an example, fill it under the Domain field. Here’s an example:

Fill in the Document Root (File System Location) with the location where you want your Django project files to be stored.
Preferably, choose the directory as /home/username/domainname.com.
For our example, enter the Document Root as /home/username/mysite.com
Press submit to create a new domain for your Django project.
You should get a success message popup indicating that the domain has been successfully created with the document root of your new domain.
After creating a domain, it is time to create a new Python application that we’ll use for our Django project.
Go back to the home page of your cPanel account.
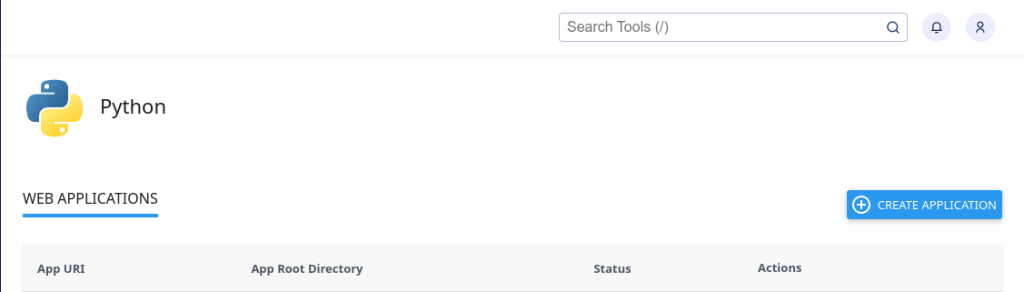
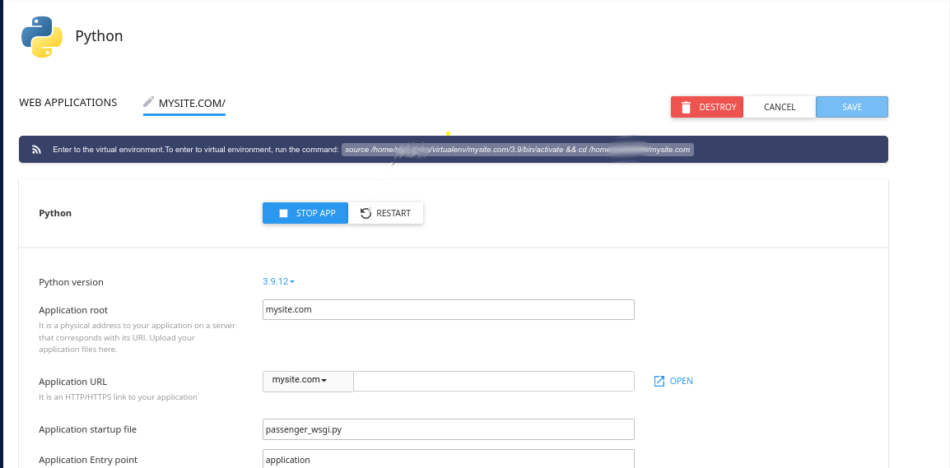
Step 2: Create a new Python endpoint
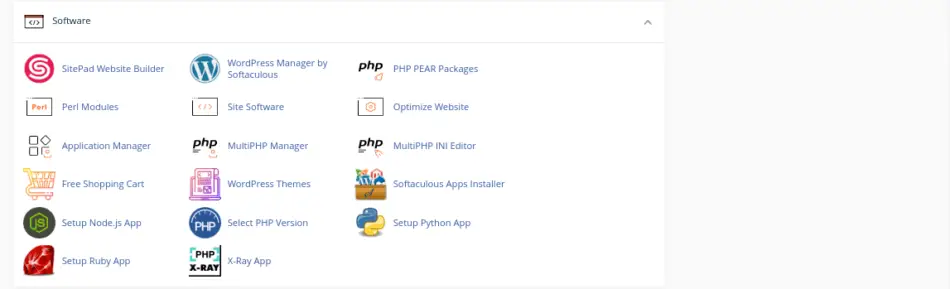
Under the Software tab, locate the “Setup Python App” link and click on it.
You will be redirected to a page that may be similar to the screenshot below.
Click on CREATE APPLICATION button.
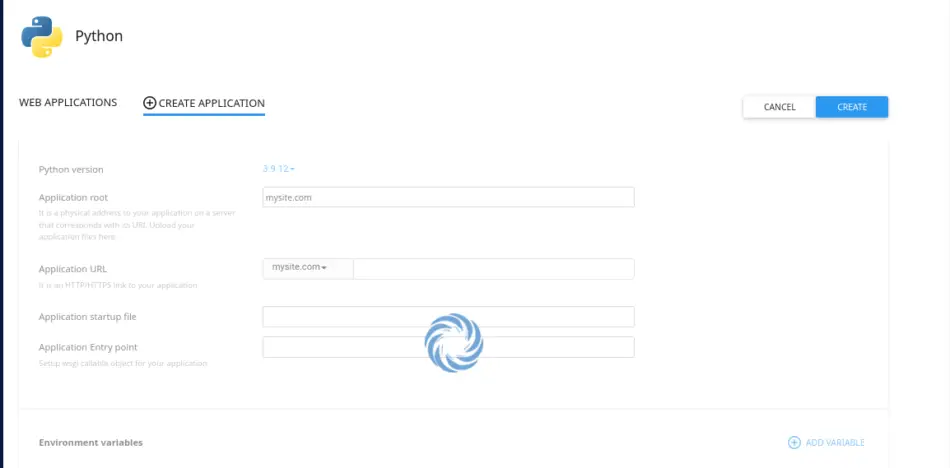
Create a new application by filling in the information as prompted.
Select the Python version and use the latest recommended Python version.
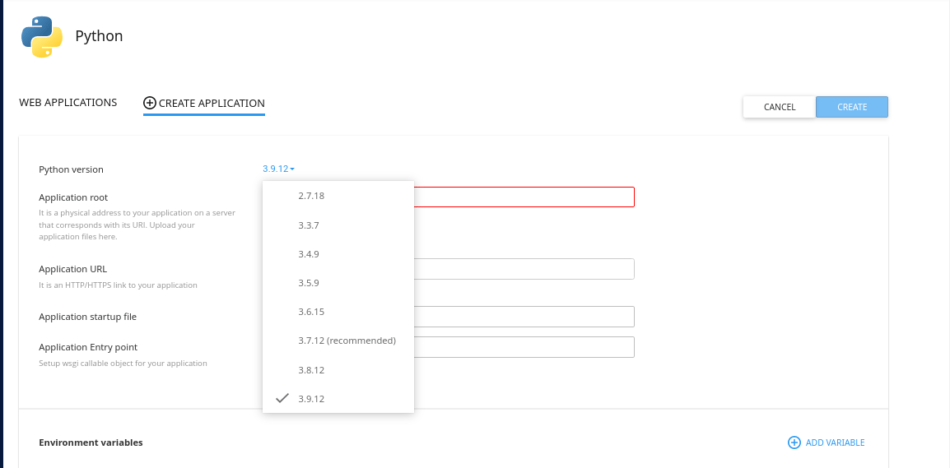
Fill in the Application root by specifying the folder that has your domain name files.
Use the document root you created when creating a new domain name.
If your domain name is mysite.com, the Application root will be:
/mysite.com

The Application URL field should have the same domain name you created earlier.
Leave everything as it is and press the Create button.
Upload your Django to cPanel
After you have created the app, open a new cPanel tab.
Upload the Django project files from your local machine into the folder where your domain name resides.
Follow these steps to do that:
Prepare your Django project files
Prepare your Django project so that you can upload it into your account file system.
To do that, navigate into the folder you have your Django project on a local machine.
Compress all the files into one zip file.
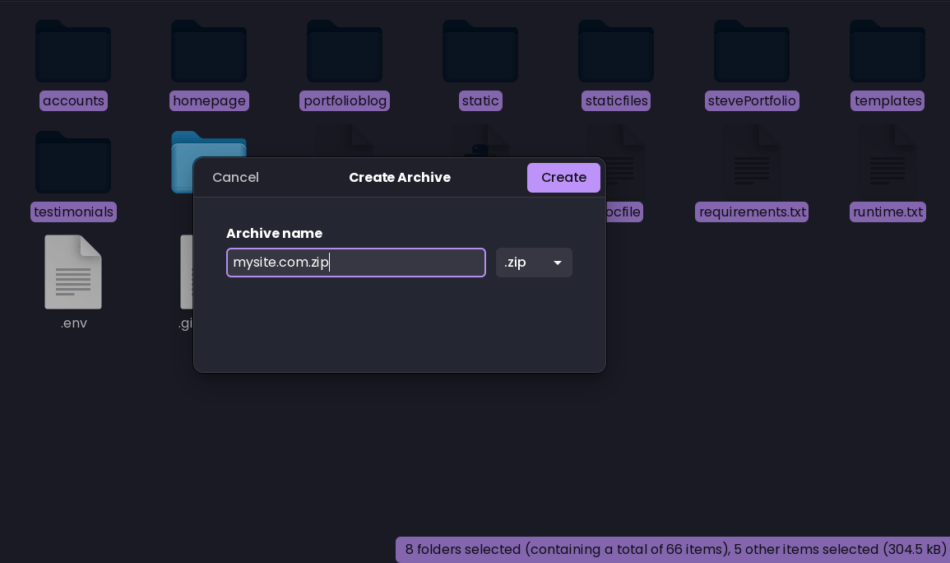
Upload the compressed file into your cPanel Python app application root.
Open the new cPanel account tab and open the file manager tool.
Locate the name of the directory with the name of your domain name.
For example, the directory will be mysite.com if you used the document root as mysite.com.

Navigate into the folder. Click on the upload button and upload the zip file you created for your project.

Drag and drop the zip file or click on the select button.
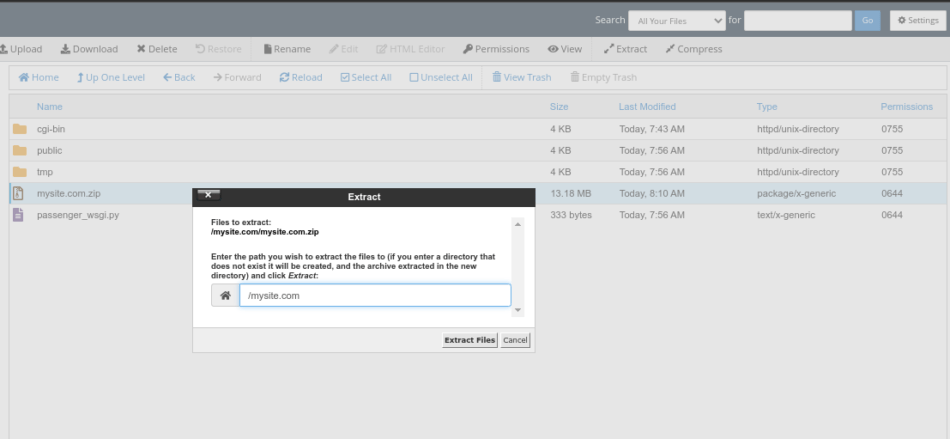
Go back to the mysite.com directory when the upload completes.
Click on the zip file you uploaded and press the Extract button at the top to extract the Django project files.
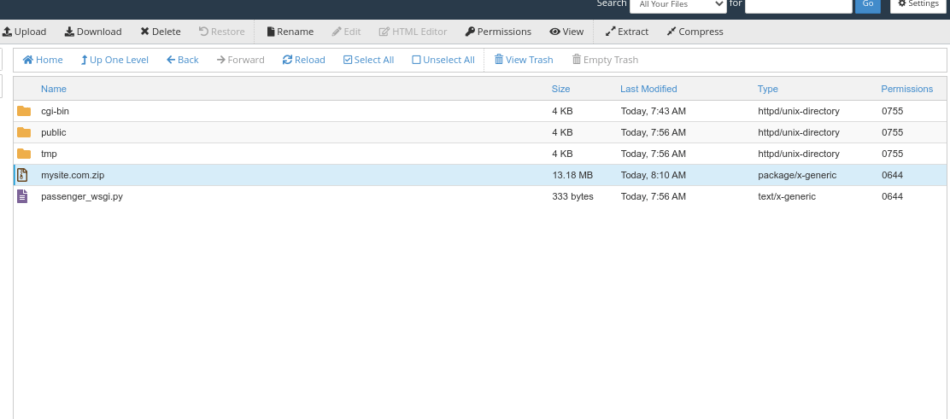
Extract the files in the current directory and delete the compressed file.
Now you are ready to deploy your Django project.
Deploy your Django project
Open another cPanel tab and navigate to the home page of your account.
On the cPanel Dashboard, look for the Terminal tool under the Advanced tab and click on it.
You can also search for the tool by typing the keyword ‘terminal’
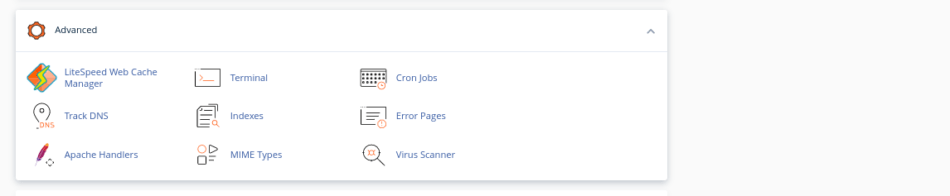
It should open a new SSH Terminal window where you can execute bash commands.
Although we created a new Python application, we need to install Django in the virtual environment created for our application.
The path where your app’s virtual environment resides should be displayed after creating your app.
Head back to the window where we successfully created a new Python app.
At the top, you should see the virtual environment for the Python app.
Copy the path and paste it into your Terminal window.

Copy the path and paste it into the cPanel Terminal window.
Press Enter to activate the virtual environment so that you may install Django.
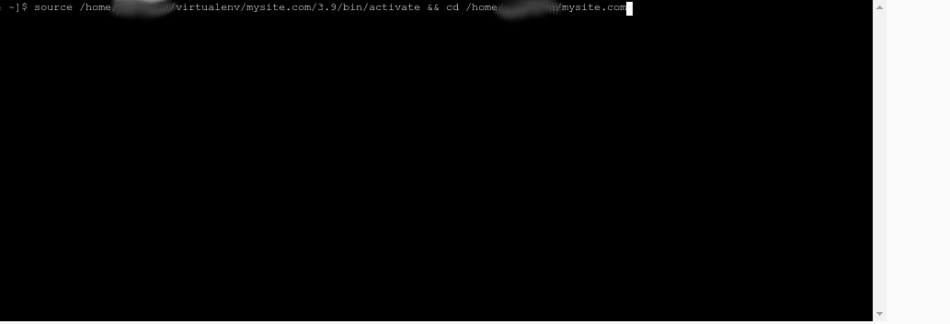
Install Django by typing the following command on cPanel:
pip install djangoIf you have a requirements.txt file, type
pip install -r requirements.txtWait for the installation to complete.
Run python manage.py makemigrations and python manage.py migrate on the Terminal to make database changes persist in the database.
If you are using environment variables, you may get an error when you run python manage.py command on the Terminal.
Here’s how to add environment variables for Python apps on cPanel
Navigate to the Python setup page where you successfully created your Python app.
Scroll to the bottom, and you should see the Environment Variables section.
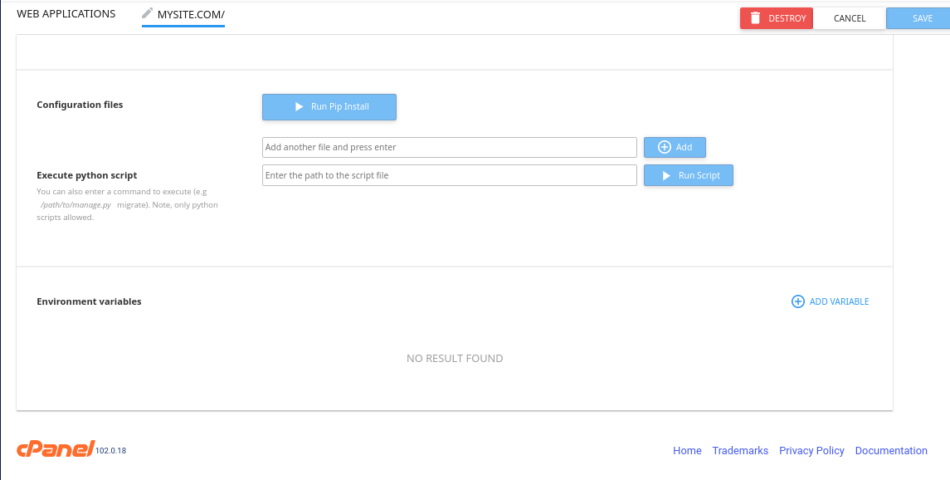
Press ADD VARIABLE button to add a new environment variable
Enter the name of the environment variable and the value.
Press DONE to create the new environment variable.
Use environment variable names similar to the variable names used on your Django project.
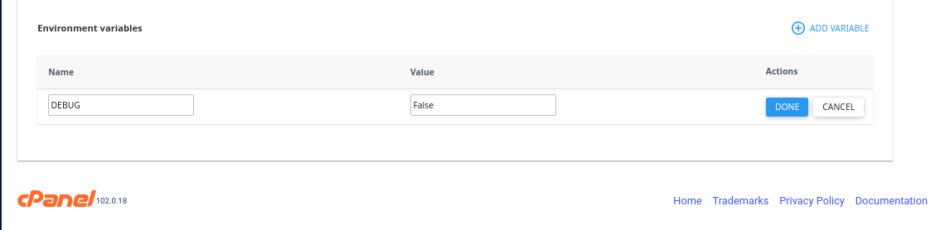
Create all the environment variables required by your Django application.
It is a good practice to enter the ALLOWED_HOSTS variable name and value here.
Be sure to add mysite.com to your Django ALLOWED_HOSTS variable.
After creating all the environment variables, press the SAVE button at the top to make the new changes reflect for your app.
Go back to the Terminal tab and run the necessary python manage.py commands. This time, the commands should run successfully.
How to connect the Django project to the default cPanel web server, WSGI
After installing Django and the packages required for your Django project, there’s another thing that you need to do for your application to use the project’s files.
Connect your Django application to the default WSGI web server interface for Python apps on cPanel.
Open the File Manager of your hosting account and locate your domain name’s folder or the directory with the Django project files.
Inside the file, you will find a file with the name passenger_wsgi.py
Right-click the file and press the edit button to edit it.
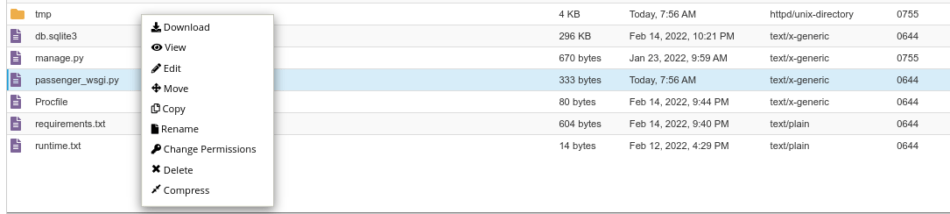
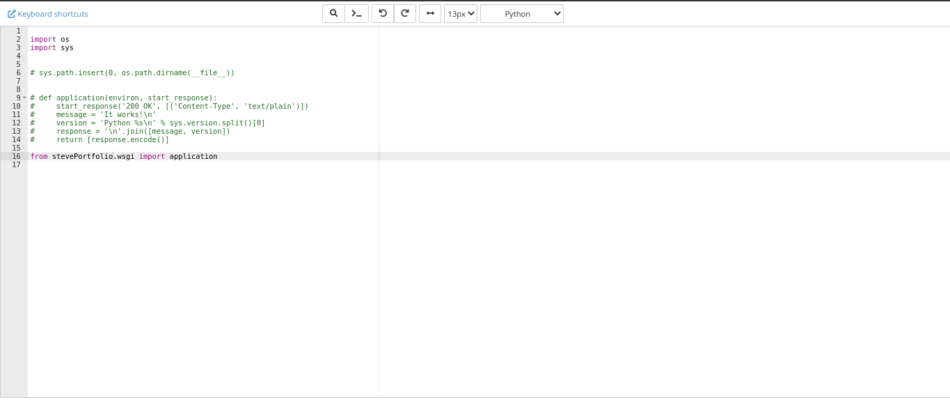
Paste the following code after deleting every line inside the file.
import os
import sys


# sys.path.insert(0, os.path.dirname(__file__))


# def application(environ, start_response):
#     start_response('200 OK', [('Content-Type', 'text/plain')])
#     message = 'It works!\n'
#     version = 'Python %s\n' % sys.version.split()[0]
#     response = '\n'.join([message, version])
#     return [response.encode()]

from simple_django_project.wsgi import application
Replace ‘simple_django_project.wsgi’ with the name of your Django project.
Save the file and close the window.
Go back to the Python apps Dashboard and restart your Python app.
Go ahead and type in the domain name in your browser’s address bar.
Aaaaand voila!
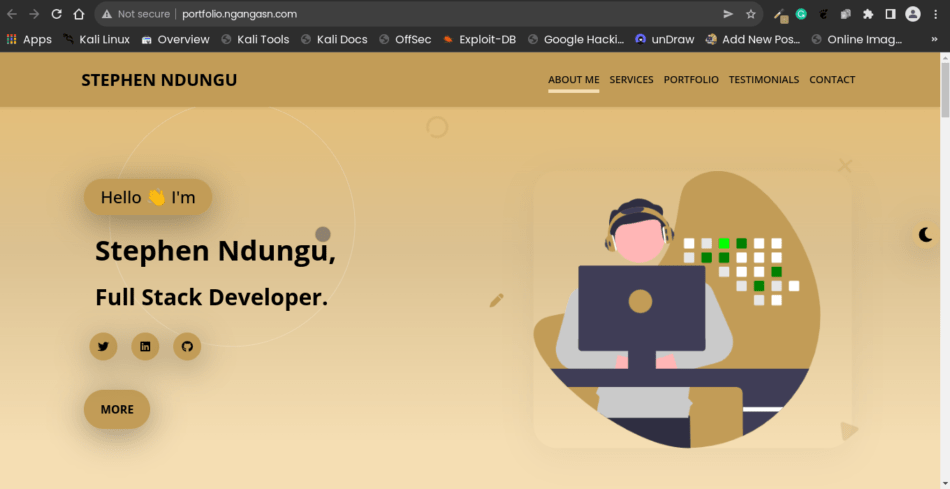
Your new application is ready for the world to see it.
Share it with your friends and family about the progress that you have achieved.
I hope the tutorial was helpful to you and that you can deploy new Django applications on Shared hosting.
Struggling to find affordable hosting for your Django web application?
This hosting service offers a cost-effective solution that is tailored for
Allowing you to:
🚀 Supercharge Your Ideas: Worried about investing too much upfront? Our affordable shared hosting lets you test and validate your innovative concepts created using Python Django without draining your budget.
🎯 Lure and Impress Clients With an Already Deployed Django Project: You just need one hosting plan to host unlimited Django websites.
⚙️ Hassle-Free Setup: With the user-friendly interface, you’ll have your Django project up and running in minutes with this Django-ready optimized host. Besides, I have written an article for you to use to deploy your Django app, here.
Act now while there is a huge discount on their hosting plans. Use the link below
See you in my next article.

